Scrapbooking is so overwhelming...there is just too much out there to start out with, you give up before you begin! This post is all about what you NEED to start out with, to be able to create a wonderful album for your family! So, lets get started on Memories in Tyme's Beginner picks!


 Punches: One thing is a must for everyone who does paper crafting is punches in various themes and sizes. To start with, I would look at what you are more navigated to, for me it is hearts and flowers and basic shapes... Punches can be used in a ton of different styles and sizes, check out this great flower punch by EK Success, which if you punch it upside down, you can see where you are punching, and with the little thumb rest that the punch has, it makes it easier to be able to see where you need to line up the shape! I would start with a couple of easy shapes that you will be able to do different things with as you go!
 Stickers: With punches, I would add stickers in various themes and colors to your toolbox. Using stickers with punches and die cuts allow you to customize projects that others might not! You can take alphabet stickers and create a one of a kind title for your page, adding a few stickers and die cuts that you have embellished to it. With most sticker sheets, you can use what you need on your project, and save the rest for something else!
 Zig markers: One thing you can never have enough of is the Zig markers...this kit is to die for! It comes with 48 markers, 4 different type of tips with 12 different colors in this great case! You can do a ton of different things with this type of a kit, great for those who like to doodle or journal! I have used my kit for at least 8 years now, so in my opinion, I have gotten more than enough use for the price I paid!!! I use one or the other marker on at least 50% off my projects in one capacity or another. If you end up doing paper piecing patterns, you most certainly will use them...I journal with them, make the detail marks on paper piecing's and more! You can get different markers, if I had to choose one set, I would choose a set of writer markers, which will give you 2 tips, a fine tip and a bit thicker of one. Any set of markers will do, I would at least make sure you have a good black marker for sure!
 Rulers: I like rulers...not only to help you see what size something is...or to cut things straight.....this particular ruler is a centering ruler which helps you to get stickers and things centered easily! You can certainly use a regular ruler, but it is much easier when you start to work on lettering projects to have them centered and looking good, and to make sure you will have enough room on your page for what you are trying to do. If you are not someone who can eyeball things easy, get this ruler!
 Adhesives: The last "main" product I want to talk about is your adhesives... One thing I recommend (and am on their design team) is Glue Dots brand adhesives. I love their tape runner, and their dots in various sizes and for various things you create. They have a vellum dot that is really great when you are trying to adhere vellum to your pages or creations! Or try their 3D dots to make anything a bit more raised... or for a different look...if you emboss, pick out your favorite embossing powder, pour over the top of the dot...heat it up, and see how cool that look is! Heat a couple of times for a more rich look!


Paper Trimmer: The first thing I would tell anyone they need is a paper trimmer and the one I would recommend is by EK Success called the Cutterpede. I like how you can extend the bars so you can trim a 12 x 12 sheet of cardstock...and how you can exchange the blades into different styles like deckle, wave or scoring blades, thus saving the need for decorative scissors! Add the blades down the line as you have a bit of extra money, or purchase the trimmer with a few blades as a great gift!
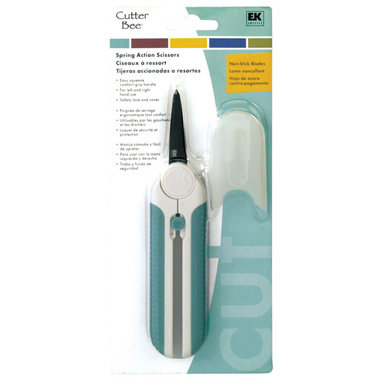
Scissors: My next must have for your toolbox is going to be a pair of scissors... I am going to tell you about a few different styles...each will do different things! If you are older and have problems with your hands, I recommend the EK Success Cutter Bee Spring Action scissors, they are great for those who have problems with using their hands on intricate projects. They are easy squeeze, spring action scissors that have a blade that is perfect for stickers and adhesive products...to not make them stick. Now, if your hands are good, you can always go with the Honey Bee scissors, also from EK Success! This style also has that same blade so stickers don't stick...and has a fine tip point to make your cuts straighter.

Craft knife: Another must have is a craft knife such as this one. It is great for little projects that your scissors won't reach. It is also good for starting cuts in the middle of a project too. There are many uses for the craft knife...this one I like because the blades are retractable so you do not get cut, and this style comes with blades in a package so when this one goes out, you have another one. This is the type of thing that unless used every day, you will have for quite a while!

Paper: One thing I cannot stress enough to people is having paper... Die Cuts With a View paper packs are awesome, they match the other papers in the pack to help you to create quite a few projects out of one pack of paper. Add a solid pack of paper to go with it, this way you will have more than enough cardstock and patterned paper to create your projects. When I purchase a pack such as this one, I get more than enough bang for my buck and the papers can all be matched up with something else in the pack if you notice!

Kits: With paper, I will add scrapbook kits to the list, or instead of the paper if this is for a gift! The best thing about kits such as this is that they do have everything needed such as the paper, and embellishments...and it should all coordinate with each other! Best part about it is you usually will have a few extra's left over so you are able to use those on other projects!
 Punches: One thing is a must for everyone who does paper crafting is punches in various themes and sizes. To start with, I would look at what you are more navigated to, for me it is hearts and flowers and basic shapes... Punches can be used in a ton of different styles and sizes, check out this great flower punch by EK Success, which if you punch it upside down, you can see where you are punching, and with the little thumb rest that the punch has, it makes it easier to be able to see where you need to line up the shape! I would start with a couple of easy shapes that you will be able to do different things with as you go! Stickers: With punches, I would add stickers in various themes and colors to your toolbox. Using stickers with punches and die cuts allow you to customize projects that others might not! You can take alphabet stickers and create a one of a kind title for your page, adding a few stickers and die cuts that you have embellished to it. With most sticker sheets, you can use what you need on your project, and save the rest for something else!
  Zig markers: One thing you can never have enough of is the Zig markers...this kit is to die for! It comes with 48 markers, 4 different type of tips with 12 different colors in this great case! You can do a ton of different things with this type of a kit, great for those who like to doodle or journal! I have used my kit for at least 8 years now, so in my opinion, I have gotten more than enough use for the price I paid!!! I use one or the other marker on at least 50% off my projects in one capacity or another. If you end up doing paper piecing patterns, you most certainly will use them...I journal with them, make the detail marks on paper piecing's and more! You can get different markers, if I had to choose one set, I would choose a set of writer markers, which will give you 2 tips, a fine tip and a bit thicker of one. Any set of markers will do, I would at least make sure you have a good black marker for sure!
  Rulers: I like rulers...not only to help you see what size something is...or to cut things straight.....this particular ruler is a centering ruler which helps you to get stickers and things centered easily! You can certainly use a regular ruler, but it is much easier when you start to work on lettering projects to have them centered and looking good, and to make sure you will have enough room on your page for what you are trying to do. If you are not someone who can eyeball things easy, get this ruler!
  Adhesives: The last "main" product I want to talk about is your adhesives... One thing I recommend (and am on their design team) is Glue Dots brand adhesives. I love their tape runner, and their dots in various sizes and for various things you create. They have a vellum dot that is really great when you are trying to adhere vellum to your pages or creations! Or try their 3D dots to make anything a bit more raised... or for a different look...if you emboss, pick out your favorite embossing powder, pour over the top of the dot...heat it up, and see how cool that look is! Heat a couple of times for a more rich look!
Totes: Now, what to put it all in...this is where you can go fun and crazy if you wish... You want to look at your style, where the supplies are going to be kept, how you are planning on using your supplies, etc. I found this cute little tote bag that has 14 organizing pockets plus a huge area to put your bulky items in it. This way, you can put all of the stuff you have bought in one place, and add to it from there! There are great organizing products we will cover in another post...but to start with, this is cheap and looks good!
The only other things I would add to your "toolbox" is a notebook, pen, pencil, eraser, and 3 x 5 cards. The notebook for notes on things you want to create...the pen/pencil is self explanatory, plus you can use the pencil to be able to journal and do your lettering first, the Zig markers to create your lettering and the eraser to erase the lettering when you are done!
I hope you enjoy this beginners post...make sure you send it to your loved ones at this time of year, and for your birthday/anniversary! Gift cards are wonderful to get this time of year, spend them getting the items you need!
Tip: To save a bit of money, look at your local craft stores such as Michaels and Joann's for coupons sent right to your email! This way you can pick out items that are a bit more expensive and save 40% off! Scrapbooking isn't about spending the most money...it's about getting your memories down on paper!
Lynda Jeffs
Memories in Tyme
Comments
Post a Comment
Thanks for the comment!!! I always like it when people take the time to look at what I create! Have a great day!!
Lynda