
Supply list:
6 x 12 sheet of cardstock for the base
Coordinating cardstock and patterned papers (I used Colorbok Sweet Blossom pack)
 2 sheets of white 8.5 x 11 cardstock for the inside pages
 Ribbon
Cricut cartidge's - Ashlyn's Alphabet, George and Basic Shapes
Sizzix die cuts - tag, heart, flower
Punch's - sun, flower, border punch, corner punch
Number stickers
Silver alpha letters
Bling
Paper flowers
Black fine tip marker
Hole punch
For me, the whole project starts with the papers I select... Once I have that part done, I can look at what I have at home and available to me to create what I want! Right now, I am on a spending freeze - so I am using up what I have at home to create fun, one of a kind projects! With the papers I have here, I was able to create 2 different albums, one to sell, and one for my own personal use! I am still working on the other album, pictures and pricing to follow!
Directions:
Step one: Decide what color you want to use as your base, cut a 12 x 12 sheet of paper in half, creating 2 bases, fold in half.

Step two: Cut the two sheets of white cardstock 3" off the long side of the paper, fold in half to make each page 5.25 x 5.5".

Step three: Take the cover, and add the inside pages to the cover. Make sure you look where you are placing them so there is equal space on both sides. Take your hole punch and where the folds are, punch a hole as far as the hole punch will go on both sides. This is for the ribbon to go through at the last step!

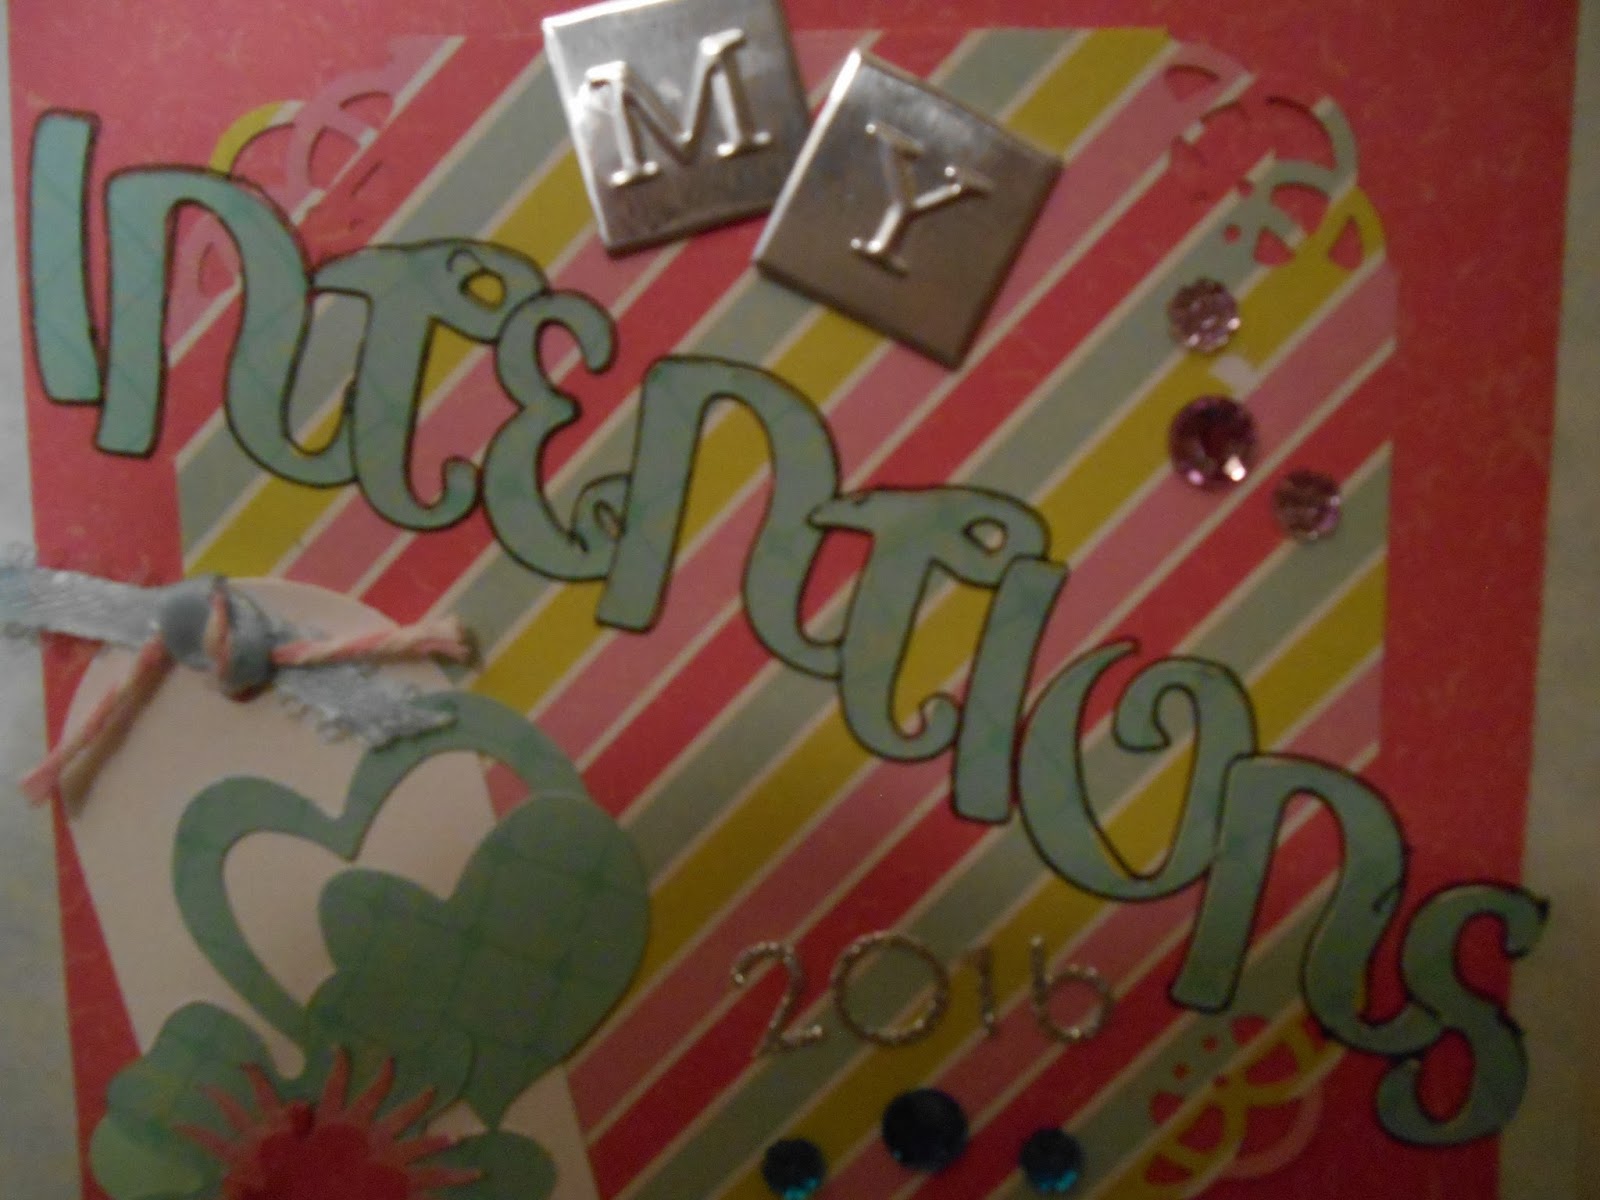
Step four: Start to work first on the cover of the project - I started with the bright pink background, adding the striped paper with decorative edges on the corners! I started with the "Intentions" title, added the "my" stickers and the 2016 (both in silver) underneath. A bit of bling underneath the 2016 and on the side - with a tag to complete the creation! With the "intentions" letters, I took my fine tip marker, and went around the entire edges to create depth!


Step six: For the page opposite the front cover - add a 5.5" squared piece of coordinating paper to the white base. Find a scrap piece of paper (or trim a piece) 1" by 5.5" to go across the middle of the paper. You will ONLY glue at the sides to allow for a booklet to be placed in the middle. Create 4 tags for the pockets, 4.5" x 4". On the top of each of these, place paper flowers or die cuts (or both) to create the flowers. We will create the book in a later step!


Step seven: For pages 3 and 4, add a patterned paper to the back of each side, with another pattern for the pocket. Create a tag (same size as above 4.5" x 4" and place inside the pocket after the adhesive has set. On top of the pocket, place a tag as well as a die cut flower on the top.


Step eight: For pages 5 and 6 - the middle of the album, this is where the ribbon will go through to hold all the pages. With the paper pack I am using, it has lined paper within it, and a color on the other side, this was a great way to use both sides. These two pages are kept more plain for a reason, I simply added the paper and 3 die cut flowers at the bottom to create a more uniform look, as it will be used for journaling.

Step nine: For pages 7 and 8, repeat step seven! I used a different color for the background, but the same color for the pockets! With a tag and a paper flower on top! (I had money and Michael's had a great set for sale, with an awesome tin when I am done!!!)


Step ten: Final page, as the back cover should be done already with the front cover! As in step 6, you will need a 1" x 5.5" piece of paper, gluing down only on the sides. Add die cut flowers to the top of the middle piece, making sure to not glue down the middle of it to allow for the book to be tucked inside. Cut 2 white bases, 8" x 5", folding in half to make it 4" x 5" for the book's inside. For the top - cut a coordinating piece of cardstock (or paper) 4" x 5", using your corner punch on 2 of the corners. Place on top of the folded white sheet. Decorate with die cut shapes and alphabet letters. Make 2 booklets, placing one with page 2!


Step eleven: Take your stamps to show you created this - and stamp the outside back cover. I also added a fun die cut shape to the back, that matches the rest of the album!


For my album, I have 2 things I want to work on personally, and 2 things for my business...first time ever! I have plenty of places to journal now, during the year - and at the end of the year! How did things work for me? It takes 21 days to change a habit...here's to a few habit's being changed this year!
Lynda Jeffs
Memories in Tyme
Comments
Post a Comment
Thanks for the comment!!! I always like it when people take the time to look at what I create! Have a great day!!
Lynda